 Pots and Pans
 Tawa
Tawa Kitchen Accessories
A Step-by-Step Guide to make Crispy Dosas
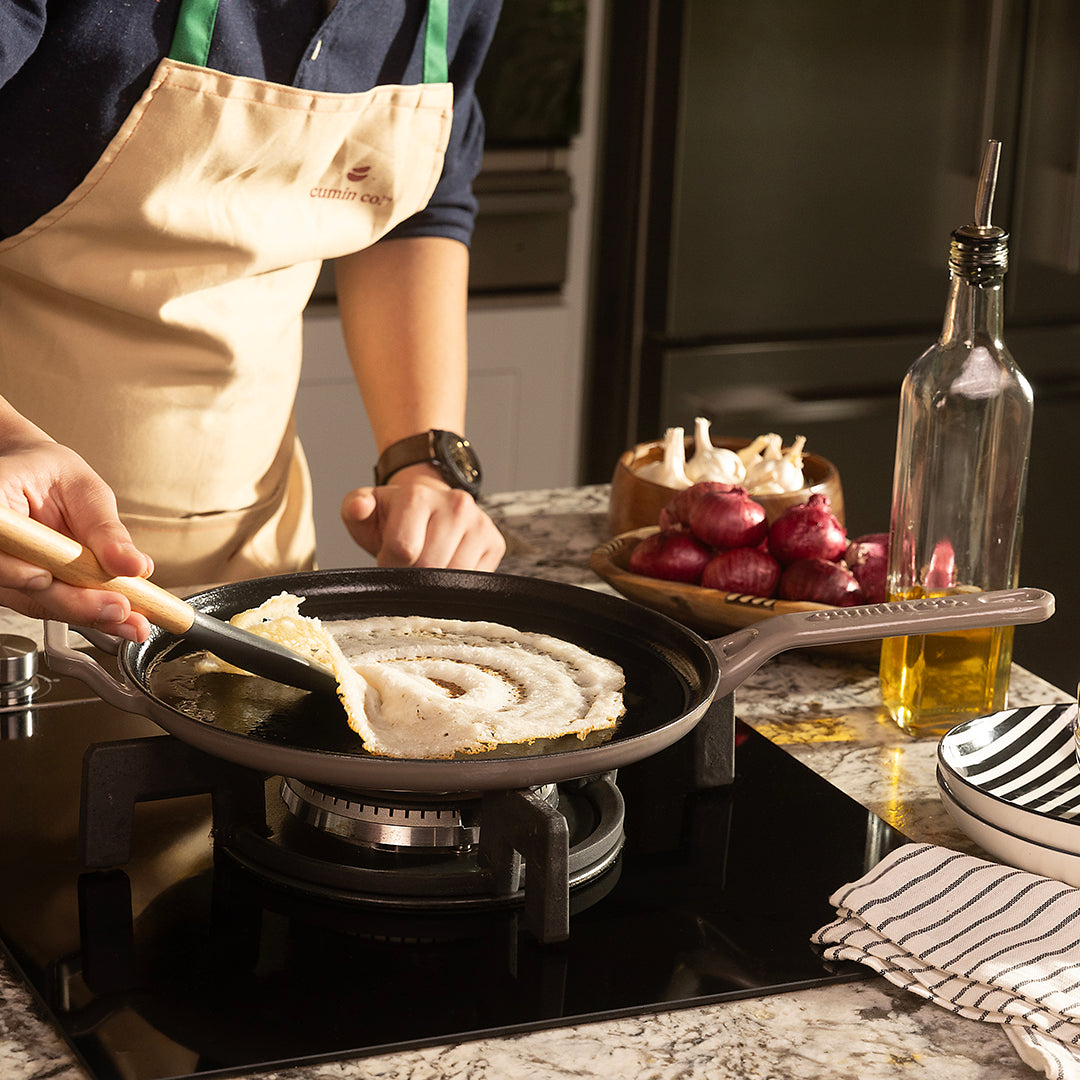
So you've just brought home your shiny new No. 11 Dosa Tawa from Cumin Co., and you're ready to make your first dosa. But... you've never made one before. Or maybe you're just nervous about messing it up?
Don't worry - we've got you. Think of this as a dosa guide made for someone who's never stepped into a kitchen. Follow this step-by-step process and you'll get a golden, crispy dosa in no time.
What You'll Need
- Your Cumin Co. No. 11 Dosa Tawa
- Dosa batter (store-bought or homemade)
- Oil or ghee
- A small bowl and spoon for spreading oil
- A flat spatula
- Patience - just about 10 minutes worth!
Let's Get Cooking
STEP 1: Wash your tawa before first use (1 minute)
Before anything else, rinse the dosa tawa with warm water and a few drops of mild soap. Dry it fully with a soft cloth. This gets it ready for its first flip.
STEP 2: Heat the pan (3-5 minutes)
Put the pan on low to medium flame for ~3 minutes. DO NOT put any oil on the pan while you are pre-heating. To check if it's hot, sprinkle a few drops of water on the side (not the center).
If it sizzles and vanishes, you're ready.
Tip: Don't put water in the middle - it cools the pan and can make your dosa stick
STEP 3: Lightly grease the surface (30 seconds)
Add a few drops of oil or ghee on the pan. Use the back of a spoon, an oil brush, or half an onion to spread it out evenly.
Important: Cover the entire surface where you plan to cook - even the edges. No dry patches! This helps your dosa release cleanly and cook perfectly.
STEP 4: Do a quick patch test (30 seconds)
Before pouring the full batter, drop a small spoon of dosa batter onto the center of the pan and spread it a little.
If it sizzles and cooks easily without sticking, your pan is ready. If it sticks or takes too long, wait another minute and test again. This step saves your dosa - and your batter!
STEP 5: Pour the batter (1 minute)
Take a ladle of dosa batter (about 1/2 cup) and pour it in the center of the dosa tawa. Quickly spread it out in a spiral motion - think of drawing a big circle with the back of your spoon.
Goal: A thin, even circle that covers most of the tawa.
STEP 6: Drizzle oil on the edges (30 seconds)
Once it's spread out, drop a few drops of oil along the outer edge of the dosa. This helps make the edges golden and crispy.
STEP 7: Let it cook - and don't touch it yet! This is where the dosa starts to shine.
Wait and watch:
The edges will turn golden and start to lift slightly, The top will look dry - no runny batter.
You'll notice the dosa gently releasing itself from the pan - that's your sign it's ready to be flipped or folded
Don't poke or force it! A good pan will do the work for you once the dosa is cooked.
STEP 8: Flip or Fold and Serve (30 seconds)
You don't need to flip a dosa - just fold it in half with your spatula and lift it off the pan. But if you like both sides crispy, flip and cook the other side for 1 more minute.
That's It!
You've just made your first crispy dosa. Serve it hot with coconut chutney, sambar, or just a dollop of butter.
Cleaning Your Dosa Tawa After it cools down:
- Wash with warm soapy water and a soft sponge.
- No steel scrubbers - the enamel coating is tough but gentle care keeps it beautiful.
- Dry it completely before putting it away.
- For difficult stains, put baking soda and water in your pan and let it boil for ~1min. Let it cool and wash with regular soap and sponge.
Why Cumin Co.'s Dosa Tawa Makes It Easy
- No seasoning needed
- Uses 40% less oil
- Even heat = no patchy dosas
- Compatible with all stoves
- Non-toxic & safe for families
Making dosa isn't hard. With the right pan and the right instructions, it's as simple as making toast - just a little more delicious!
Happy cooking, and welcome to the Cumin Co. kitchen.


